
Getting started with ECMAScript 6
This blog post helps you to get started with ECMAScript 6 (ES6):
- It explains how you can interactively try out ES6.
- It lists ES6 features that are easy to adopt, along with how those features are coded in ES5.
Trying out ECMAScript 6
There are three simple ways to play with ES6:
- Web browser: use the online Babel REPL, an interactive playground that compiles ES6 to ES5. There is nothing to install with this option.
- Command line: use
babel-node, a version of the Node.js executable that understands ES6 (and internally compiles it to ES5). It can be installed via npm. - Various JavaScript engines: check the ES6 compatibility table by kangax to find out which ES6 features are supported natively where.
More details on options 1 and 2 are given next.
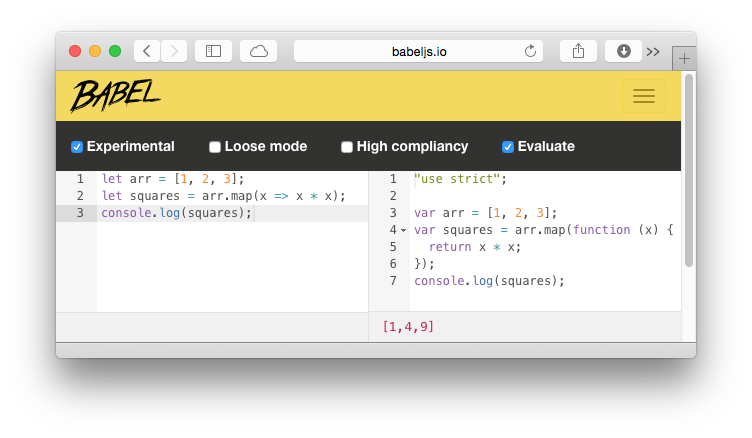
The Babel REPL
The Babel REPL has four major sections:
- The top left pane contains the ES6 source code.
- The bottom left pane shows syntax errors discovered in the ES6 code.
- The top right pane contains the ES5 code that the ES6 code is compiled to.
- The bottom right pane shows output produced via
console.log().
babel-node
The babel-node executable can be installed via npm:
$ npm install --global babel
You can use it in the same way as you would the Node.js executable node. Like node, an interactive REPL is started like this:
$ babel-node
Once you are in that REPL, you can execute ES6 code:
> let arr = [1, 2, 3];
> arr.map(x => x * x)
[ 1, 4, 9 ]
Note that babel-node does not currently support multi-line input.
The Babel website has more information the Babel CLI tools.
The remaining sections of this post describe ES6 features that are easy to adopt.
From var to let/const
ES6 has two new ways to declare variables:
letis (roughly) a block-scoped version ofvar.constis likelet, but creates constants, variables whose values can’t be changed.
You can generally replace each var with a let or a const. But you shouldn’t do so blindly, because the different kind of scoping can change how code behaves. As an example, look at the following ES5 code:
var x = 3;
function func(randomize) {
    if (randomize) {
        var x = Math.random(); // (A) scope: whole function
        return x;
    }
    return x; // accesses the x from line A
}
func(false); // undefined
That func() returns undefined may be surprising. You can see why if you rewrite the code so that it more closely reflects what is actually going on:
var x = 3;
function func(randomize) {
    var x;
    if (randomize) {
        x = Math.random();
        return x;
    }
    return x;
}
func(false); // undefined
If you replace var with let in the initial version, you get different behavior:
let x = 3;
function func(randomize) {
    if (randomize) {
        let x = Math.random();
        return x;
    }
    return x;
}
func(false); // 3
Thus, blindly replacing var with let or const is risky. My advice is:
- Only use
let/constin new code. - Leave old code as is or refactor it carefully.
More information: chapter “Variables and scoping” in “Exploring ES6”.
From IIFEs to blocks
In ES5, you had to use an IIFE if you wanted to keep a variable local:
(function () {  // open IIFE
    var tmp = ···;
    ···
}());  // close IIFE

console.log(tmp); // ReferenceError
In ECMAScript 6, you can simply use a block and a let declaration:
{  // open block
    let tmp = ···;
    ···
}  // close block

console.log(tmp); // ReferenceError
More information: section “Avoid IIFEs in ES6” in “Exploring ES6”.
From concatenating strings to template literals
With ES6, JavaScript finally gets literals for string interpolation and multi-line strings.
String interpolation
In ES5, you put values into strings by concatenating those values and string fragments:
function printCoord(x, y) {
    console.log('('+x+', '+y+')');
}
In ES6 you can use string interpolation via template literals:
function printCoord(x, y) {
    console.log(`(${x}, ${y})`);
}
Multi-line strings
Template literals also help with representing multi-line strings.
For example, this is what you have to do to represent one in ES5:
var HTML5_SKELETON =
    '<!doctype html>\n' +
    '<html>\n' +
    '<head>\n' +
    '    <meta charset="UTF-8">\n' +
    '    <title></title>\n' +
    '</head>\n' +
    '<body>\n' +
    '</body>\n' +
    '</html>\n';
If you escape the newlines via backslashes, things look a bit nicer (but you still have to explicitly add newlines):
var HTML5_SKELETON = '\
    <!doctype html>\n\
    <html>\n\
    <head>\n\
        <meta charset="UTF-8">\n\
        <title></title>\n\
    </head>\n\
    <body>\n\
    </body>\n\
    </html>';
ES6 template literals can span multiple lines:
const HTML5_SKELETON = `
    <!doctype html>
    <html>
    <head>
        <meta charset="UTF-8">
        <title></title>
    </head>
    <body>
    </body>
    </html>`;
(The examples differ in how much whitespace is included, but that doesn’t matter in this case.)
More information: chapter “Template literals and tagged templates” in “Exploring ES6”.
From function expressions to arrow functions
In current ES5 code, you have to be careful with this whenever you are using function expressions. In the following example, I create the helper variable _this (line A) so that the this of UiComponent can be accessed in line B.
function UiComponent {
    var _this = this; // (A)
    var button = document.getElementById('myButton');
    button.addEventListener('click', function () {
        console.log('CLICK');
        _this.handleClick(); // (B)
    });
}
UiComponent.prototype.handleClick = function () {
    ···
};
In ES6, you can use arrow functions, which don’t shadow this (line A, lexical this):
class UiComponent {
    constructor() {
        let button = document.getElementById('myButton');
        button.addEventListener('click', () => {
            console.log('CLICK');
            this.handleClick(); // (A)
        });
    }
    handleClick() {
        ···
    }
}
Arrow functions are especially handy for short callbacks that only return results of expressions.
In ES5, such callbacks are relatively verbose:
var arr = [1, 2, 3];
var squares = arr.map(function (x) { return x * x });
In ES6, arrow functions are much more concise:
let arr = [1, 2, 3];
let squares = arr.map(x => x * x);
When defining parameters, you can even omit parentheses if the parameters are just a single identifier. Thus: (x) => x * x and x => x * x are both allowed.
More information: chapter “Arrow functions” in “Exploring ES6”.
Handling multiple return values
Some functions or methods return multiple values via arrays or objects. In ES5, you always need to create intermediate variables if you want to access those values. In ES6, you can avoid intermediate variables via destructuring.
Multiple return values via arrays
exec() returns captured groups via an Array-like object. In ES5, you need an intermediate variable (matchObj in the example below), even if you are only interested in the groups:
var matchObj =
    /^(\d\d\d\d)-(\d\d)-(\d\d)$/
    .exec('2999-12-31');
var year = matchObj[1];
var month = matchObj[2];
var day = matchObj[3];
In ES6, destructuring makes this code simpler:
let [, year, month, day] =
    /^(\d\d\d\d)-(\d\d)-(\d\d)$/
    .exec('2999-12-31');
The empty slot at the beginning of the Array pattern skips the Array element at index zero.
Multiple return values via objects
The method Object.getOwnPropertyDescriptor() return a property descriptors, an object that holds multiple values in its properties.
In ES5, even if you are only interested in the properties of an object, you still need an intermediate variable (propDesc in the example below):
var obj = { foo: 123 };

var propDesc = Object.getOwnPropertyDescriptor(obj, 'foo');
var writable = propDesc.writable;
var configurable = propDesc.configurable;

console.log(writable, configurable); // true true
In ES6, you can use destructuring:
let obj = { foo: 123 };

let {writable, configurable} =
    Object.getOwnPropertyDescriptor(obj, 'foo');

console.log(writable, configurable); // true true
{writable, configurable} is an abbreviation for:
{ writable: writable, configurable: configurable }
More information: chapter “Destructuring” in “Exploring ES6”.
From for to forEach() to for-of
Prior to ES5, you iterated over Arrays as follows:
var arr = ['a', 'b', 'c'];
for (var i=0; i<arr.length; i++) {
    var elem = arr[i];
    console.log(elem);
}
In ES5, you have the option of using the Array method forEach():
arr.forEach(function (elem) {
    console.log(elem);
});
A for loop has the advantage that you can break from it, forEach() has the advantage of conciseness.
In ES6, the for-of loop combines both advantages:
let arr = ['a', 'b', 'c'];
for (let elem of arr) {
    console.log(elem);
}
If you want both index and value of each array element, for-of has got you covered, too, via the new Array method entries() and destructuring:
for (let [index, elem] of arr.entries()) {
    console.log(index+'. '+elem);
}
More information: section “The for-of loop” in “Exploring ES6”.
Handling parameter default values
In ES5, you specify default values for parameters like this:
function foo(x, y) {
    x = x || 0;
    y = y || 0;
    ···
}
ES6 has nicer syntax:
function foo(x=0, y=0) {
    ···
}
An added benefit is that in ES6, a parameter default value is only triggered by undefined, while it is triggered by any falsy value in the previous ES5 code.
More information: section “Parameter default values” in “Exploring ES6”.
Handling named parameters
A common way of naming parameters in JavaScript is via object literals (the so-called options object pattern):
selectEntries({ start: 0, end: -1 });
Two advantages of this approach are: Code becomes more self-descriptive and it is easier to omit arbitrary parameters.
In ES5, you can implement selectEntries() as follows:
function selectEntries(options) {
    var start = options.start || 0;
    var end = options.end || -1;
    var step = options.step || 1;
    ···
}
In ES6, you can use destructuring in parameter definitions and the code becomes simpler:
function selectEntries({ start=0, end=-1, step=1 }) {
    ···
}
Making the parameter optional
To make the parameter options optional in ES5, you’d add line A to the code:
function selectEntries(options) {
    options = options || {}; // (A)
    var start = options.start || 0;
    var end = options.end || -1;
    var step = options.step || 1;
    ···
}
In ES6 you can specify {} as a parameter default value:
function selectEntries({ start=0, end=-1, step=1 } = {}) {
    ···
}
More information: section “Simulating named parameters” in “Exploring ES6”.
From arguments to rest parameters
In ES5, if you want a function (or method) to accept an arbitrary number of arguments, you must use the special variable arguments:
function logAllArguments() {
    for (var i=0; i < arguments.length; i++) {
        console.log(arguments[i]);
    }
}
In ES6, you can declare a rest parameter (args in the example below) via the ... operator:
function logAllArguments(...args) {
    for (let arg of args) {
        console.log(arg);
    }
}
Rest parameters are even nicer if you are only interested in trailing parameters:
function format(pattern, ...args) {
    ···
}
Handling this case in ES5 is clumsy:
function format() {
    var pattern = arguments[0];
    var args = [].slice.call(arguments, 1);
    ···
}
Rest parameters make code easier to read: You can tell that a function has a variable number of parameters just by looking at its parameter definitions.
More information: section “Rest parameters” in “Exploring ES6”.
From apply() to the spread operator (...)
In ES5, you turn arrays into parameters via apply(). ES6 has the spread operator for this purpose.
Math.max()
ES5 – apply():
> Math.max.apply(null, [-1, 5, 11, 3])
11
ES6 – spread operator:
> Math.max(...[-1, 5, 11, 3])
11
Array.prototype.push()
ES5 – apply():
var arr1 = ['a', 'b'];
var arr2 = ['c', 'd'];

arr1.push.apply(arr1, arr2);
    // arr1 is now ['a', 'b', 'c', 'd']
ES6 – spread operator:
let arr1 = ['a', 'b'];
let arr2 = ['c', 'd'];

arr1.push(...arr2);
    // arr1 is now ['a', 'b', 'c', 'd']
More information: section “The spread operator (...)” in “Exploring ES6”.
From concat() to the spread operator (...)
The spread operator can also turn the contents of its operand into array elements. That means that it becomes an alternative to the Array method concat().
ES5 – concat():
var arr1 = ['a', 'b'];
var arr2 = ['c'];
var arr3 = ['d', 'e'];

console.log(arr1.concat(arr2, arr3));
    // [ 'a', 'b', 'c', 'd', 'e' ]
ES6 – spread operator:
let arr1 = ['a', 'b'];
let arr2 = ['c'];
let arr3 = ['d', 'e'];

console.log([...arr1, ...arr2, ...arr3]);
    // [ 'a', 'b', 'c', 'd', 'e' ]
More information: section “The spread operator (...)” in “Exploring ES6”.
From constructors to classes
ES6 classes are mostly just more convenient syntax for constructor functions.
Base classes
In ES5, you implement constructor functions directly:
function Person(name) {
    this.name = name;
}
Person.prototype.describe = function () {
    return 'Person called '+this.name;
};
In ES6, classes provide slightly more convenient syntax for constructor functions:
class Person {
    constructor(name) {
        this.name = name;
    }
    describe() {
        return 'Person called '+this.name;
    }
}
Derived classes
Subclassing is complicated in ES5, especially referring to super-constructors and super-properties. This is the canonical way of creating a sub-constructor of Person, Employee:
function Employee(name, title) {
    Person.call(this, name); // super(name)
    this.title = title;
}
Employee.prototype = Object.create(Person.prototype);
Employee.prototype.constructor = Employee;
Employee.prototype.describe = function () {
    return Person.prototype.describe.call(this) // super.describe()
           + ' (' + this.title + ')';
};
ES6 has built-in support for subclassing, via the extends clause:
class Employee extends Person {
    constructor(name, title) {
        super(name);
        this.title = title;
    }
    describe() {
        return super.describe() + ' (' + this.title + ')';
    }
}
More information: chapter “Classes” in “Exploring ES6”.
From custom error constructors to subclasses of Error
In ES5, it is impossible to subclass the built-in constructor for exceptions, Error (the chapter “Subclassing Built-ins” in “Speaking JavaScript” explains why). The following code shows a work-around that gives the constructor MyError important features such as a stack trace:
function MyError() {
    // Use Error as a function
    var superInstance = Error.apply(null, arguments);
    copyOwnPropertiesFrom(this, superInstance);
}
MyError.prototype = Object.create(Error.prototype);
MyError.prototype.constructor = MyError;
In ES6, all built-in constructors can be subclassed, which is why the following code achieves what the ES5 code can only simulate:
class MyError extends Error {
}
More information: section “Subclassing built-in constructors” in “Exploring ES6”.
From function expressions in object literals to method definitions
In JavaScript, methods are properties whose values are functions.
In ES5 object literals, methods are created like other properties. The property values are provided via function expressions.
var obj = {
    foo: function () {
        ···
    },
    bar: function () {
        this.foo();
    }, // trailing comma is legal in ES5
}
ES6 has method definitions, special syntax for creating methods:
let obj = {
    foo() {
        ···
    },
    bar() {
        this.foo();
    },
}
More information: section “Method definitions” in “Exploring ES6”.
From objects to Maps
Using the language construct object as a map from strings to arbitrary values (a data structure) has always been a makeshift solution in JavaScript. The safest way to do so is by creating an object whose prototype is null. Then you still have to ensure that no key is ever the string '__proto__', because that property key triggers special functionality in many JavaScript engines.
The following ES5 code contains the function countWords that uses the object dict as a map:
var dict = Object.create(null);
function countWords(word) {
    var escapedWord = escapeKey(word);
    if (escapedWord in dict) {
        dict[escapedWord]++;
    } else {
        dict[escapedWord] = 1;
    }
}
function escapeKey(key) {
    if (key.indexOf('__proto__') === 0) {
        return key+'%';
    } else {
        return key;
    }
}
In ES6, you can use the built-in data structure Map and don’t have to escape keys. As a downside, incrementing values inside Maps is less convenient.
let map = new Map();
function countWords(word) {
    let count = map.get(word) || 0;
    map.set(word, count + 1);
}
Another benefit of Maps is that you can use arbitrary values as keys, not just strings.
More information:
- Section “The dict Pattern: Objects Without Prototypes Are Better Maps” in “Speaking JavaScript”
- Chapter “Maps and Sets” in “Exploring ES6”
From CommonJS modules to ES6 modules
Even in ES5, module systems based on either AMD syntax or CommonJS syntax have mostly replaced hand-written solutions such as the revealing module pattern.
ES6 has built-in support for modules. Alas, no JavaScript engine supports them natively, yet. But tools such as browserify, webpack or jspm let you use ES6 syntax to create modules, making the code you write future-proof.
Multiple exports
In CommonJS, you export multiple entities as follows:
//------ lib.js ------
var sqrt = Math.sqrt;
function square(x) {
    return x * x;
}
function diag(x, y) {
    return sqrt(square(x) + square(y));
}
module.exports = {
    sqrt: sqrt,
    square: square,
    diag: diag,
};

//------ main1.js ------
var square = require('lib').square;
var diag = require('lib').diag;

console.log(square(11)); // 121
console.log(diag(4, 3)); // 5
Alternatively, you can import the whole module as an object and access square and diag via it:
//------ main2.js ------
var lib = require('lib');
console.log(lib.square(11)); // 121
console.log(lib.diag(4, 3)); // 5
In ES6, multiple exports are called named exports and handled like this:
//------ lib.js ------
export const sqrt = Math.sqrt;
export function square(x) {
    return x * x;
}
export function diag(x, y) {
    return sqrt(square(x) + square(y));
}

//------ main1.js ------
import { square, diag } from 'lib';
console.log(square(11)); // 121
console.log(diag(4, 3)); // 5
The syntax for importing modules as objects looks as follows (line A):
//------ main2.js ------
import * as lib from 'lib'; // (A)
console.log(lib.square(11)); // 121
console.log(lib.diag(4, 3)); // 5
Single exports
Node.js extends CommonJS and lets you export single values from modules, via module.exports:
//------ myFunc.js ------
module.exports = function () { ··· };

//------ main1.js ------
var myFunc = require('myFunc');
myFunc();
In ES6, the same thing is done via export default:
//------ myFunc.js ------
export default function () { ··· } // no semicolon!

//------ main1.js ------
import myFunc from 'myFunc';
myFunc();
More information: chapter “Modules” in “Exploring ES6”.
What to do next
Now that you got a first taste of ES6, what should you do next? I have two suggestions:
- In “Exploring ES6”, each major feature of ES6 has its own chapter, which starts with an overview. Browsing the chapters is therefore a good way of getting a more complete picture of ES6.
- The chapter “Deploying ECMAScript 6” describes the options you have for deploying ES6 in current JavaScript environments.


Book (free online) and exercises

Book (free online)

Book (free online)
Book (free online)
Newsletter (free)